Nowadays, blinds have gained considerable popularity - they are installed both in private homes and in offices. Most often, specialists are engaged in the installation of systems, but installing the blinds on a plastic window with your own hands is also quite possible and does not even require any special skills or tools. You can install these curtains in several ways, the choice of which depends on the interior and functionality.
Horizontal blinds
On sale you can find several varieties of horizontal blinds at once. The lamels in them are installed horizontally, which is the reason for the name of the design. Thickness, width and type of material can be arbitrary. The design can be mounted inside the frame, to the frame itself, to the slope or on top of the window unit.

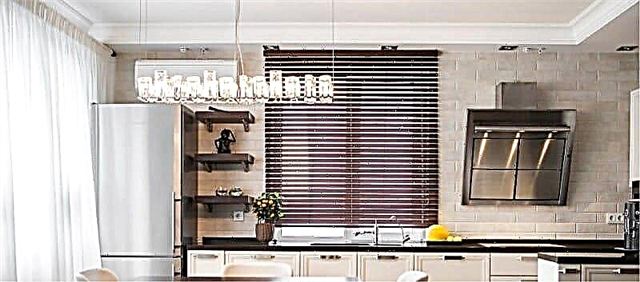
Horizontal blinds are most often installed in institutions.
Install such blinds in offices, at production facilities and other places. These designs are universal - if desired, you can find horizontal blinds of almost any color and shade.
Vertical blinds
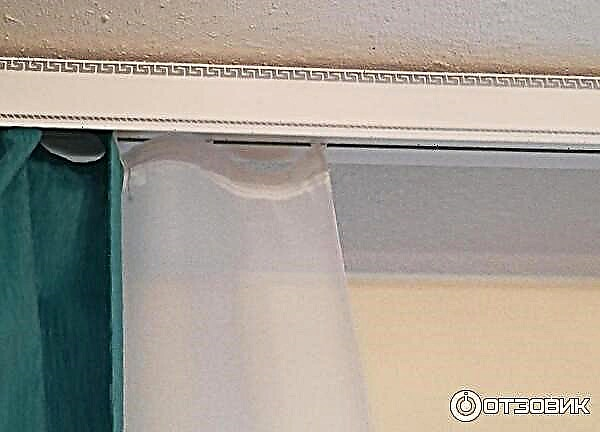
Due to the design features, such blinds are most often mounted on top of windows.. The lamellas in this case are oriented vertically, made of plastic or fabric. Varieties differing in the length of lamellas are presented on the market.
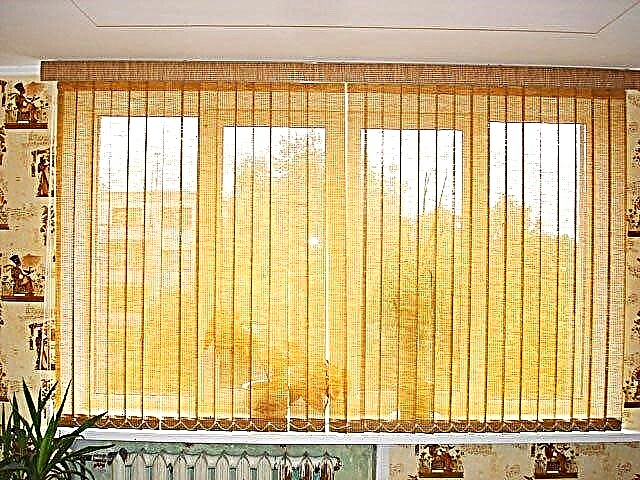
Vertical blinds are mainly installed in residential premises.
Installation of this model is most often done in private homes, but they are in demand in offices. Installation of vertical blinds is carried out on self-tapping screws. As an alternative, ceiling mounting is practiced.
Roller blinds
Roller blinds are made of fabric, completely cover the glass, if desired, they can be lifted by turning into a roll. Installation is carried out using brackets, screws or on adhesive tape.

Roller blinds can be installed without drilling walls and flaps - on double-sided tape
The need for drilling varies by type:
- Vertical structures are mounted on top of the window or under the ceiling. In both cases, you have to drill the surface.
- Horizontal blinds can be attached to the upper slope or to the casement windows. Without drilling, such structures can be mounted on the casement of a window unit.
- The interframe analogue, as the name suggests, is intended for installation inside the window itself. This option requires drilling the largest number of holes.
Preparation and measurements
To install the blinds you will need the following tool:
- screwdriver or screwdriver,
- a pencil or marker
- roulette.
So that all efforts are not wasted, it is important to correctly and accurately take measurements - only then will the design work efficiently. In addition, it should be located absolutely symmetrical to the double-glazed window. Blinds fastened with adhesive tape are more tolerant of errors - if desired, they can be corrected. For analogues with fastening on self-tapping screws, it will be necessary to make additional holes, which is unlikely to benefit the beauty of the window, here flaws are unacceptable.

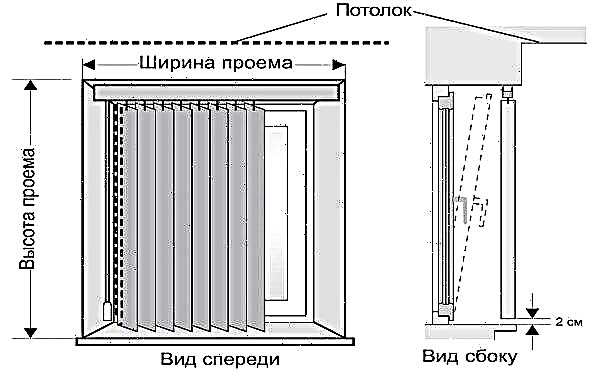
At the first stage of installation, the blinds measure the width and height of the window
To correctly position the structure relative to the window and floor level, you will need to measure the following parameters:
- window opening dimensions,
- length to the bottom of the curtain,
- distance between fixtures.
For horizontal blinds installed on the leaves, you will need to additionally measure the size of each glass. To the obtained results add 2 cm to the upper and lower edges and 0.5 cm to the sides..
Installation of vertical blinds
Installation of vertical blinds is actually not such a difficult process as it might seem initially, and everyone can cope with this task. If the length of the curtain is small, then the installation is carried out inside the window opening. Otherwise, the structure is installed under the ceiling or on the wall.
The action algorithm is as follows:
- Markup. The first step is to calculate the center point of the window - it should be on the same level with the center of the cornice. To avoid errors, mark the edges of the structure. Places for self-tapping screws should be marked on both sides approximately 0.5-0.6 cm closer to the center of the window.
- Grade Level. In the process, it is necessary to ensure that the lamellas are located vertically. The lower part should be 1-2 cm from the floor. A similar distance should be maintained to the windowsill if installed directly in the opening.
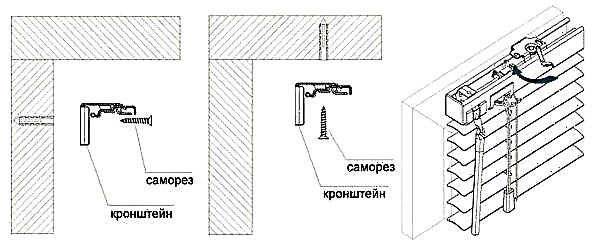
- Bracket mount. The holes for the dowels should be prepared in advance, so that it remains only to install them. The bracket is attached using self-tapping screws. Subsequently, to mask these elements, you can install complete clips. When drilling a wall, you should act very carefully, since otherwise you can break off part of the wall.

Vertical blinds are fixed with screws to the wall or ceiling.
Installation of chains and lamellas. After fixing the cornice, there will be just a little bit - hang the lamellas, start the runners, and also attach the control chain. An important point: the lamellas are always hung in the same order in which they are in the box. Otherwise, you can spoil the whole picture (if there is one).
Installation of horizontal blinds
Fixing horizontal blinds to plastic windows is somewhat more complicated. The main thing is to clearly follow the instructions:
- The first step is to fix the upper fasteners. This is done with a screwdriver. First, holes are prepared, after which the bracket is fixed with screws.
- We hung the cornice. It should be fixed until it clicks.
- The holes for the lower fasteners are drilled with their own hands. When choosing a diameter, the dimensions of the thread lock connecting the lamellas should be taken into account. Most often, horizontal blinds require additional holes on the sides. This helps to insert the latch connected to the lamella web into the corners.

When installing horizontal blinds yourself, carefully follow the instructions
Important: independent installation is required to be done as carefully as possible. Very often the slightest mistake turns out to be that the whole structure is functioning incorrectly.
Interframe curtains
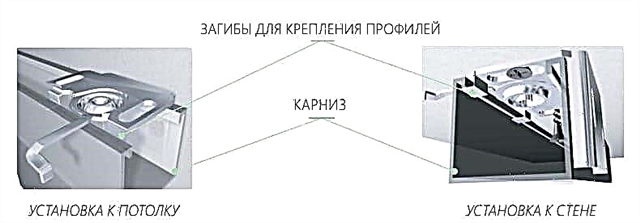
Interframe curtains are used only for double frames. Installation of this type of blinds is somewhat more complicated than the previous ones, and the process itself will result in an inevitable violation of the integrity of the profile: at least two holes will have to be drilled through which a handle and cord will be pulled out to control the system.
The curtains themselves are mounted in the inner sash, more precisely - in its upper part, and the bracket - directly to the upper profile. Installation of the design is in many ways similar to working with horizontal blinds.

Interframe curtains are installed in double-glazed windows
Do-it-yourself installation of the system is carried out according to the following algorithm:
- The window frame is untwisted, and the blinds are applied to the inner sash. This is used to check for matching sizes.
- Marking is made for fastening, as well as the output points of the cord and control knob, after which holes with a diameter of about 5 mm are drilled.
- Brackets are inserted into calipers, cords and control knobs are brought out, with the cord through the bottom hole.
- Inter-frame blinds are mounted on the sash with special inter-frame brackets.
- An adapter is installed on the frame, and a control knob is connected to the flexible output.
- The latch for the control handle and cord is installed.
- The frame is twisted back.

The blind control is displayed through the frame.
As you can see, the technology for installing blinds on plastic windows without drilling is completely unsuitable here. The principle itself resembles the installation of all other design options with the only difference being that you have to disassemble the frame, screw the bracket into the interframe space, and display the controls through the drilled holes.
Useful Tips
In order for the blinds to be able to serve for many years, some operating rules should be observed:
- When buying, you should carefully check the equipment and all equipment, especially fasteners. They must be of high quality.
- Choose the adjustment mechanism wisely - it should be on the convenient side for operation.
- Make sure that no one opens the windows when the blinds have not yet been fully folded.
- The rotary handle must not interfere with other hardware or touch it.
- Do not forget about periodic maintenance.
- Installing the blinds on the windows is quite capable and do-it-yourself, but it is better to entrust its repair to a professional.
- Plastic constructions are preferable: caring for them is much easier.
- Do not clean the system too often, this will only lead to rapid wear of the protective layer.
Do-it-yourself installation of the device, as you can see, is a very simple matter, whether it is metal, plastic or wooden blinds on plastic windows. The main thing is that there is a high-quality instruction at hand. Thanks to this material, you can hang the blinds as quickly and efficiently as possible.
Installation instructions for horizontal blinds on the wall / ceiling
To properly install the blinds to the wall or ceiling, you need to perform the following steps.
Step 1. We check the complete set of curtains and lay out all the details on the work surface.
Make sure that the set of curtains includes: universal fasteners for blinds 2 pcs. (or standard brackets), screws, blinds themselves assembled. If you install blinds with a width of more than 2 m, then an intermediate fastener should be attached to the set of fasteners, which will fix the curtain in the middle, preventing it from sagging.
Step 2. We apply the curtains to the wall / ceiling, determine the exact place of their installation and mark the left and right edges of the blinds with the help of a tape measure and level. Next, from each mark (in the direction away from the center), indent 2-3 cm and also put marks - these are places for the installation of fasteners-brackets.
Step 3. Now we attach the right and left fasteners to these marks and mark the exact drilling locations directly through the screw holes. We drill these marks with a drill. Drilling depth should be 3-4 cm.
Step 4. Next, we fasten the brackets to the wall or ceiling using self-tapping screws. The figure below shows how to do this correctly.

Step 5. If you are installing blinds with a width of more than 2 m, then at this stage you need to install intermediate fasteners. To do this, mark the middle between the already installed fasteners and repeat the steps from steps 3 and 4.
Tip: for reliable installation of heavy aluminum, bamboo and wooden curtains, intermediate fasteners are also installed 10 cm from the control thread, since this place has a heavy load.
Step 6. Insert and close the upper curtain rod of the blinds in the bracket locks. If these are standard brackets, then the cornice is simply screwed to them with screws.
Installation instructions for horizontal blinds in the window opening

To install horizontal blinds in the window opening, you need to perform the following work.
Step 1. Check the equipment and lay out all the details on the work surface.
Make sure that the following are attached to the blinds: fasteners for the blinds (brackets) 2 pcs., Screws, the blinds themselves assembled.
Step 2. We try on the curtains to the desired place in the window niche and check if the blinds interfere with the opening.
Step 3. Now we apply the right and left fasteners to the upper inner plane of the window niche, departing from its walls by 2-3 cm towards the center, then make notes in the places of the holes of the fasteners. Thus, you get 2 marks on the right and 2 marks on the left.
Step 4. Now drill holes using these marks. Drilling depth should be 3-4 cm.
Step 5. We fasten the right and left fasteners (in accordance with the sides and marks) to the upper plane of the window opening using self-tapping screws.
Step 6. Insert and close the upper curtain rod of the blinds in the bracket locks by simply turning and / or pressing the lever clockwise. If you use ordinary brackets for fastening, then the curtain rod of the blinds is simply screwed.
For instructions on how to install blinds directly on plastic windows with your own hands, see this video:
Installation of blinds on windows without drilling
We can install you blinds on plastic windows without drilling on a special double-sided tape.
Advantages of installing blinds on windows without drilling:
The windows remain airtight (no need to seal holes in the winter with putty)
The integrity of the window is not violated (which is important if you live in a rented apartment)
Can be easily replaced with other types of blinds or curtains
We have already installed the blinds in Balashikha at the following addresses:
Secondary school №6, Balashikha, Krupskaya street, house 4
Secondary school No. 12, Balashikha, Enthusiasts highway, 53
Secondary school №15, Balashikha, microdistrict Zarya, st. Gagarina, house 2
ANO "Lyceum" Intellect ", Balashikha, st. Zarechnaya, house 7
Pharmacy, Balashikha, st. Twardowski, building 26
Pharmacy, Balashikha, microdistrict of Dzerzhinsky, house 16
“Tandem project”, Balashikha, Schelkovskoe highway, house 15
The Knight, Balashikha, st. Sosnovy Bor, house 2
"SMU 97", Balashikha, st. Zvezdnaya, house 7
Sibstroydor, Balashikha, st. Solnechnaya, house 6a
"Base MTS", Balashikha, Pokrovsky passage, 4
"Master Profile Logistics", Balashikha, md. Lukino, possession 49
MedContract, Balashikha, Enthusiasts highway, possession 1A
Sportmaster, Balashikha, Novomiletsky highway, possession 2
and dozens more private apartments and cottages
Free check out
specialist for measurement
Various payment methods
(including non-cash)
Designs and installation methods
Window blinds are of two types - vertical and horizontal. Vertical lamels are usually made of plastic or a special dense fabric cut into strips 10-15 cm wide. Less commonly, aluminum lamellas or synthetic threads can be found.

Vertical blinds can be used not only for windows, but also for plastic doors with full glazing
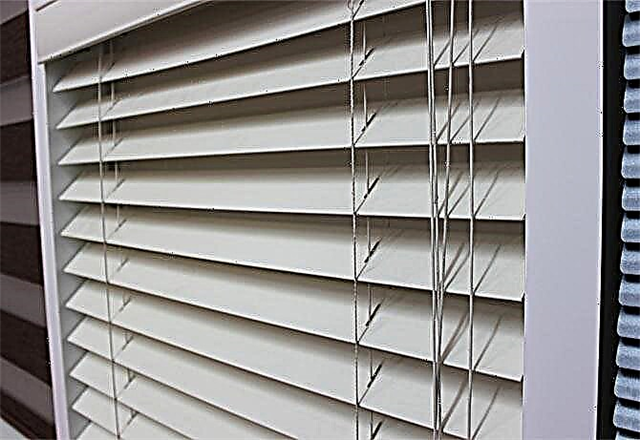
The louvres of horizontal blinds are plastic, wooden and metal. Regardless of the type and material, they consist of a cornice and lamellas. Cornice - a plastic or aluminum profile of a U-shaped section in which the controls are located and to which the lamellas are suspended. Lamels - horizontal or vertical stripes / plates that actually cover the opening. In order to be able to open and close the blinds, there are controls - chains or threads.
The design of horizontal blinds includes a large number of threads
In horizontal models, there is also a control rod associated with a rotary mechanism. Rotating the rod, change the angle of inclination of the lamellas. That is how you can change the amount of light and the "degree of transparency" of the window. If the slats are set vertically (almost), they completely overlap the view. With a horizontal position, they almost do not interfere with the review, but there are still plenty of other provisions.
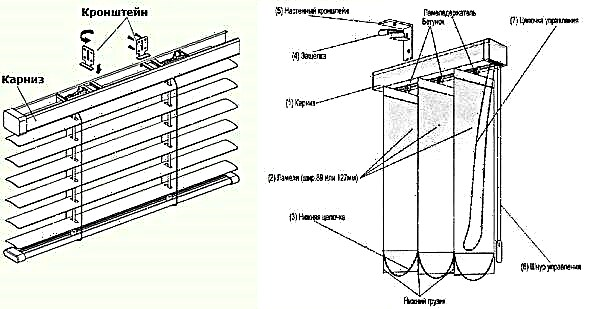
The device of horizontal and vertical blinds
When installing the blinds, it is necessary to fix the cornice. To fix it, specially designed brackets are included. These brackets are attached to the window or wall, and the cornice is simply put on them (until they click).
You can install blinds on plastic windows in several ways:
- Directly on each casement. This installation method allows you to use the windowsill at any time. The only limitation is that you cannot place objects close to the frame. Many are afraid of the need to make holes in the PVC profile with this installation method.The presence of several additional holes in the plastic does not affect the properties of the window. Moreover, blinds can be fixed to the opening casement without drilling.
- Fix in the opening so that only the window closes, but not the adjacent walls. With this installation method, the cornice is attached to the upper slope.
- Fasten to the ceiling. At the same time, there should be enough space to open the sash (at least 5 cm).
- On the wall.
- Attach the curtain rod directly to the wall above the window.
- Install on optional long brackets. This option is suitable for shallow window openings when the blinds hanging close to the wall do not allow the sash to open.

How to install blinds on plastic windows: installation methods
With the installation method, the blinds will have to be determined before the purchase: the size of the paintings depends on this. So the type of installation must be selected before measurements.
We take measurements
With the type of blinds (horizontal, vertical) and the way they are installed (on the wall, ceiling, in the window on the sash, in the window opening), you must decide before buying. And even before you start taking measurements. Because for a different installation method, different sizes are required. Only with the right measurements will it be easy to install the blinds on the plastic windows.
That everything worked well, it is necessary to take measurements correctly
Another important point: each window must be measured separately. Sometimes it just seems like they are exactly the same. Believe me, there is a difference. And the measurement results must be recorded and signed, which particular window you measured and what kind of casement it is. Accurate and detailed records will help to avoid confusion during the purchase and installation.
In the window opening
Although the appearance of the products is different, when measuring there is no difference between horizontal and vertical models. If you intend to install the blinds in the window opening, it is necessary to subtract 2 cm from each side of its width. 1-3 cm can be subtracted from the height of the opening. Such gaps are needed so that the canvas hangs freely in the opening and the lower edge of the lamellas does not rub along the windowsill.
How to measure when installing in a window opening
Please note that it is possible to install the blinds on plastic windows “into the opening” not flush with the edge of the opening, but deeper - at the glass itself or by retreating 5 or more centimeters from the edge. If the aperture has a trapezoidal shape, the height / width of the aperture will be less for the glass, so we carefully measure it. And also, in this case, it is better to put marks for installation even when measuring. Then you will definitely know where it will be necessary to install the blinds on the plastic windows so that their sizes fit perfectly.
To ceiling or wall
Here the measurements depend on your desires. The length of the blinds can be up to the floor or only to the windowsill. Moreover, depending on the type of installation chosen, the lamellas can cover the window sill or not. So the length is as you like best.

This is a wall mount. When mounting on the ceiling will increase in length., And how much - you choose
The width of the blinds with this installation method is wider than the window opening. How wider it is depends on your desire, but the minimum approach is 5 cm on each side. But if the window is in the same plane with the wall surface, you will need additional brackets that are not included in the package: the lamellas should be carried at least 5 cm from the surface of the glass so that they do not interfere with opening the sashes for ventilation.
On the sash
When installing blinds on a multi-leaf window, there are two possibilities - to put a device on each leaf or order one long window. Usually the first option is chosen - it makes it possible to open and close the sashes with the blinds lowered. If you chose this installation method, you will need to measure each leaf and record the results. Sashes may be different, so be careful.

The option on the right is more convenient
The width of the blinds when installed on the wings is taken 3 cm wider than the glass. When hanging, a lamella approach of 1.5 cm is obtained on the profile. It is convenient and does not interfere with opening / closing windows. The length depends on the location of the fastener, but usually it is 5 cm longer than the height of the glass.
Once again, we draw your attention: we measure each leaf!
How to install blinds on plastic windows: fasten to a wall or window opening
The first thing you need to do is markup. We install brackets in the cornice. We place them on the right and left so that they do not interfere with the operation of the blinds. Installation height depends on the selected product length.
We attach the curtains, mark with a pencil on the wall the places for installing the fasteners in the brackets. If we install horizontal blinds (they are light and almost do not create loads), it is enough to put one self-tapping screw / dowel. Vertical ones are heavier, so you need to install all the hardware from the kit.
Installation of blinds on the ceiling and walls is the same. Only the mounting location of the bracket changes
There is a second way. At the selected level, use the building level to draw a horizontal line, try to avoid tilting - this will affect the blinds (skew). Attach the lower part of the bracket to this line, draw marks for drilling through the holes with a pencil. If the length of the cornice is more than 2 m, an additional bracket is required to increase the rigidity of the structure, which is mounted in the middle.
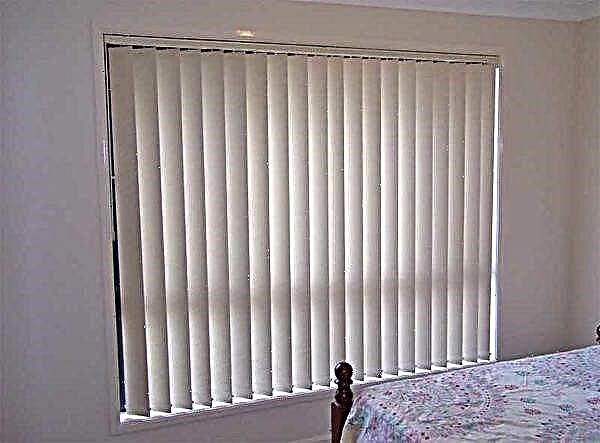
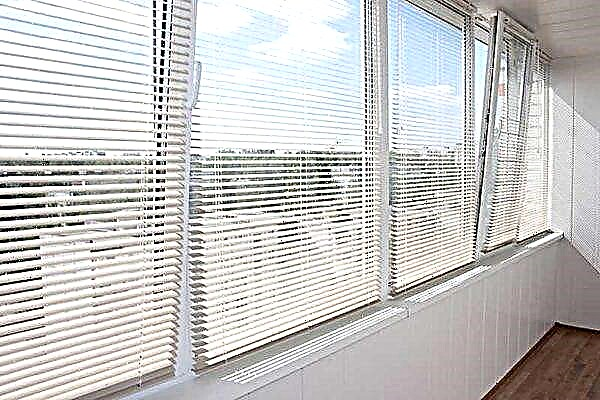
It looks like vertical blinds installed in the window opening
When attaching to brick or concrete, at the marked points, we drill holes in the wall or ceiling. Drill or punch - who has what is available. The diameter of the drill depends on the size of the dowels. They usually come in the kit, but you can put your own.
We insert expansion dowels into the finished holes, carefully hammer them with a hammer. We put the brackets, fasten them with screws or nails (if the dowel-nails are used). We install a cornice on the brackets, insert the plugs on the sides. For horizontal blinds, attach a shaft (handle) to control the rotary mechanism. To do this, install a special hook directly into the mechanism itself (included), attach the tip of the rod to this hook.
Installation step by step
The procedure is as follows:
- We install the mountings on the cornice so that they do not interfere with the moving parts inside.
- We try on the product on the frame. We expose it so that the lamellas go on the drain frame and on the right at the same distance.
- We mark with a pencil or marker the place where the fasteners should be located. During this operation, you must keep the cornice as evenly as possible. You can navigate by the contours of the window frame or use the level.
- Although the plastic is quite soft and you can immediately screw the screws into it so that the frame does not crack, it is better to drill holes beforehand. The diameter of the drill is slightly smaller than the diameter of the screws. Usually, self-tapping screws with a diameter of 3 mm are included, so the drill must be taken 2 mm or 2.5 mm.
- We take the brackets, fasten them with screws on the frame.

The need to drill holes in the window frame can be frightening, but there is nothing to worry about. In case of incorrectly made holes, unsuccessful ones can be filled with sealant. White silicone, not acrylic (acrylic quickly turns yellow). The characteristics of the windows will not be affected. What could be dangerous is to get into a double-glazed window. Then it can crack. But this is not fatal - it can be replaced, although it will be expensive.
We put the lower latches
But that is not all. To finally install horizontal blinds on plastic windows, you need to drill a couple more holes - under the clips (also called antiveter). These are additional fastenings below on the opening casement window. They fill the bottom edge of the blinds. They do this so that when airing the blinds do not hang down, do not dangle from the wind and do not knock objects on the windowsill.

We put the latches this way: we try on, pulling the blinds down a bit, mark the fasteners, drill holes, install. We fill the lower bar into the installed clips. Now, even with a draft or an open sash, the blinds will not hang. The only thing that needs to be monitored during installation is not to get into the glazing bead (this is a long bar that runs along the glass and holds it). It is necessary to drill a hole in the frame itself, backing at least 1 cm from the edge. The rest is no problem.
Without drilling
There is also a way to install blinds on plastic windows and not drill the frame. This method is only available for those blinds that are hung on opening sashes. In this case, they are simply hung on plastic mounts / brackets that are worn on top of the frame. To prevent them from moving, a strip of double-sided tape is attached to the back of the bracket. After removing the protective film, it can be glued (but not fixed).

The shape of the plastic mounts depends on the type of cornice. So you need to select for each specifically
These L-shaped plastic brackets are not included, but you can buy them at a store or at a company that sells horizontal blinds. This method is convenient by simply dismantling the blinds, which is convenient if they need to be repaired or washed.
Assembly of vertical blinds
Vertical blinds are installed exactly as described above. The difference is that the lamellas are installed after the cornice has been fixed (the guide along which the runners move). For convenience, before attaching the slats, you can turn the sliders with the adjustment cord so that the slots in them stand perpendicular to the cornice. Next, just snap the lamellas into the runners, inserting the strip until it clicks. So, in turn, we fix all the lamellas.
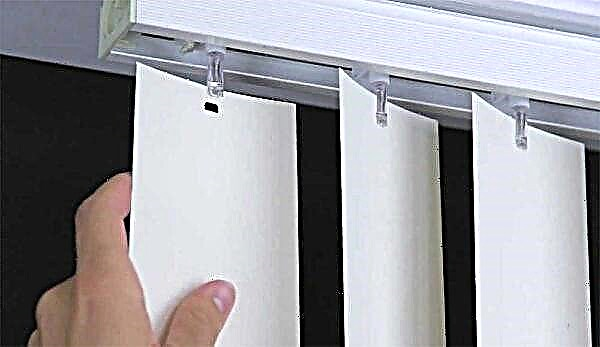
Fastening plastic vertical slats
If the lamellas are made of matter, then after installing them, do not forget to insert the lower weight. Next, we attach the lower connecting chain to the lamellas.