Depending on how many levels are made, gypsum plasterboard ceilings are one- two-, three- or four-level. In addition, it can be "closed" ceilings, which are divided into round, square, oval and rectangular.

The basic types of plasterboard ceilings are as follows:
- single-level
- simple two- and three-level,
- complex designs.
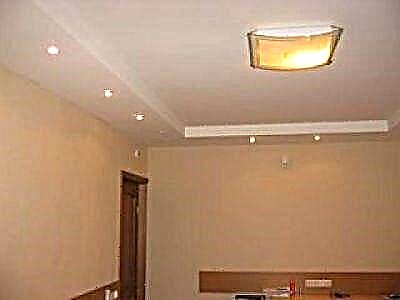
Plasterboard single level ceiling
This is an option for those who need a flat surface into which it is planned to integrate spotlights.
Among other things, this design can be the basis for the installation of the following levels of much more complex variations of drywall.

The basis of single-level ceilings are frame structures, which are performed, as a rule, under the most ceiling base of wooden beams or aluminum profile. The lathing is sheathed with drywall, after which the lighting is mounted and the finish is carried out. Such a ceiling system, in fact, simply “lowers” the main ceiling slightly, however, the lined surface remains smooth, even if the foundation of a newly built house sags.
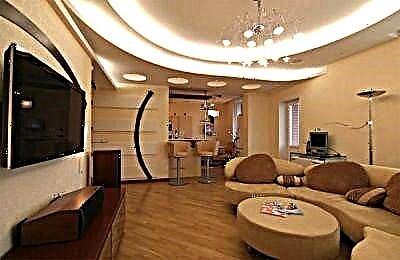
Two- and three-level plasterboard ceilings
These types of ceilings are distinguished by the following features:
- the first level can serve as the capital base of the ceiling, and directly a single-level ceiling made of drywall,
- each subsequent level always has a smaller area than the previous one,
- Installation of the 2nd and 3rd levels is carried out by installing a frame of a similar design on the ceiling, but in this case, the basis for fastening in this case is, as a rule, not a concrete base, but the previous level frame.
What are simple multi-level drywall ceilings:
- Framework. This is a kind of one- or two-stage low box, often made figuratively. It is being erected around the entire perimeter of the ceiling, and the thickness is about half a meter. Often, spotlights are built into the plasterboard box on the ceiling, and a hidden LED backlight is formed along its inner perimeter.

- Diagonal. In this case, the 2nd and 3rd levels seem to divide the ceiling in half from opposite angles, with each level usually having a curly, often wavy shape.
- Zonal. The second and third levels are often allocated a specific area of the room. However, most of the room, as a rule, has one level and a very insignificant part - the other.

Types of complex multi-level drywall ceilings:
In some ways, such ceilings have an identical design with simple multi-level ceilings, only they have a more complex structure - with different patterns, as well as original design solutions, etc. And therefore it is impossible to provide a certain list of options in this case. So we’ll just give some examples of complex plasterboard ceilings, so that you have an idea of what it is about.
Some types of complex plasterboard ceilings:
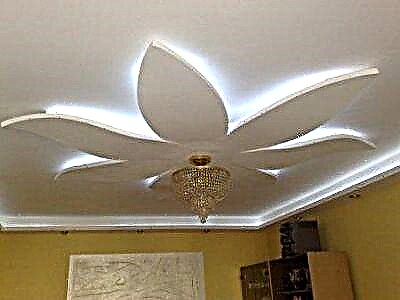
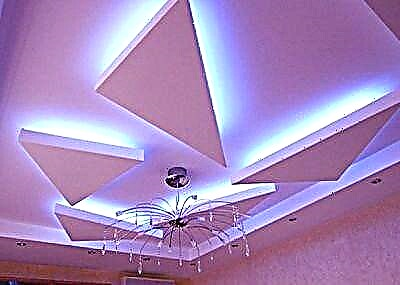
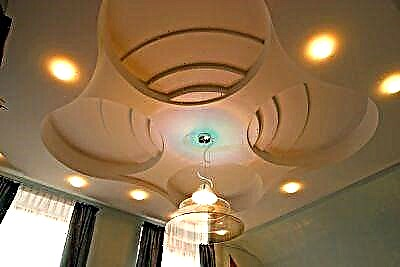
- Figured ceilings. They are based on the creation of a structure in the form of some interesting figure, for example, an intricate circle, flower, etc. As a rule, such figures are made using plasterboard of the 2nd and / or 3rd level.
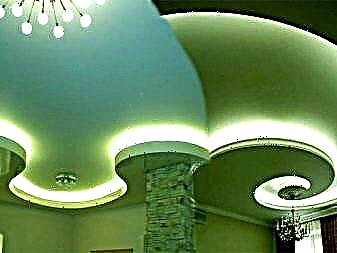
- Ceiling Abstractions. Already from the name it follows that we are talking about an abstract ceiling, and it can be made in absolutely any form, according to your desire. Basically, ceiling abstractions make an unusually illuminated beautiful irregular spiral. On such a ceiling can be located several figures - in different parts of its surface.

- “Soaring Ceilings”. They are distinguished by a somewhat unusual system of fastening elements from drywall to a concrete floor.
- Patterned ceilings. This type of drywall ceiling is characterized by the same finely meshed pattern over the entire surface. Often, patterned ceilings are difficult to perform, but they invariably create a presentable appearance for the room. They are widely popular among wealthy segments of the population.
Advantages of drywall ceilings:
- strength and functionality of the material,
- the ability to implement any design decisions,
- extreme environmental friendliness,
- the absence of "dirty" processes during installation,
- the room receives a favorable microclimate and atmosphere,
- universality - suitable for installation in any room, including bedrooms, living rooms, children's rooms and workrooms,
- excellent refractory and soundproof properties - ideal for living quarters,
- profitability - installation is cheaper than in the case of suspended ceilings, despite the fact that the installation of such structures should be carried out exclusively by professionals.

Disadvantages of Plasterboard Ceilings
This material is afraid of moisture, so if you are flooded with neighbors, you are in serious trouble. First of all, the ceiling will need to be allowed to completely dry. As for restoration work, it will be either repainting the ceiling, or replacing part of the drywall sheets and subsequent puttying of their painting.
In addition, the gypsum board ceiling is not a collapsible structure, therefore, certain difficulties are possible during maintenance and during repair of communications after the installation of such a ceiling.
Well, and, of course, he takes some height from the room.
Features of the installation of drywall ceilings
It is important to understand that drywall is a rather fragile material, and this should always be considered when working with it. Fastening large sheets is better for two or even three, self-installation of drywall is not recommended, even if these are small sheets. Accordingly, this material must also be cut very carefully and with a well-sharpened knife. This will allow you to prevent deformation and crumbling of the edges, as well as greatly facilitate further actions - on the putty of the surface.

Another important nuance is the thickness of drywall. It varies from 9.5 to 18 mm. But which one to choose will depend on where it is planned to be applied. For example, for walls the optimum thickness is 12 mm, and for the ceiling it is better to buy a thinner one - 9.5 mm. As for thick drywall, it is also suitable for walls, but it is rational to install it only in places where there will be a serious load on the wall.
Remember that the weight of one square meter of drywall construction can reach 12 kilograms. And for installation You will need the following tools:
- hammer,
- level,
- electric drill,
- scissors for metal,
- hammer drill
- tools for plastering.


And finally, the question that everyone who first encounters with such material as drywall is thinking about - whose production should it be? After all, the construction market today offers drywall and domestic and production, and manufactured by European companies. Of course, the elite and expensive material from Germany or England of higher quality, but also the drywall made from domestic raw materials, will not be much inferior in its characteristics.
As for leaving, there are no special nuances here. The plasterboard ceiling only needs to be cleaned of dust as necessary.
Drywall is the most commonly used material today in the arrangement of ceilings. And this is not surprising given the variability of this facing method, which we told you about. You have a wide selection and certain knowledge - build, let your house be decorated with a reliable and eco-friendly drywall ceiling!
Video review: Installation of a single-level plasterboard ceiling
Advantages and disadvantages
In ancient times, plaster was used for a variety of rooms: from burial chambers to palaces. Today, such material is still very popular in creating suspended ceilings. because he has many advantages.
- Eco-friendly gypsum ceiling coatings. Such material is natural, it is completely neutral in relation to the human body. Rooms with gypsum ceilings have a very pleasant atmosphere.
- The ability of such materials to reflect light. Such coatings reflect most of the light that falls on them. For this reason, you can not make gypsum ceiling coverings with backlight. Additional light sources do not have to be provided even in dark rooms, whose windows face north. =
- Thermal insulation qualities. Gypsum ceiling coatings can very well retain heat in rooms, so using such materials can save a lot in winter.
- The ability to provide sound insulation in rooms. Perforated materials are distinguished by this advantage.
- Resistance to water. Particularly expensive products are able to withstand even direct contact with the liquid.
- Fire safety. Such material does not support combustion even when exposed to open flame.

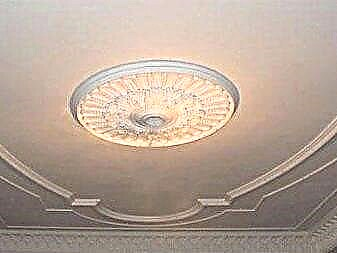
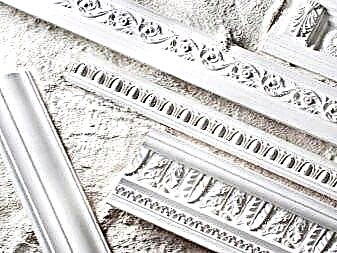
- Liquid gypsum can quickly become hard. Using this material, you can create a variety of decorative elements: beautiful arches, details of fireplaces, various partitions, decorations, sockets, bas-reliefs, columns, baguettes and so on.
- Ease of installation. Before carrying out installation work, it is not necessary to additionally process the ceiling surface, which greatly simplifies the installation of gypsum materials. If you consider all the important rules, you can carry out installation in a few hours.
- Color performance. Almost all gypsum materials are white. Some decorative elements may be painted.
The disadvantage of gypsum panels is significant weight. At present, manufacturers have figured out how to make such plates easier (thanks to a certain drying method), but in general gypsum is still quite heavy.
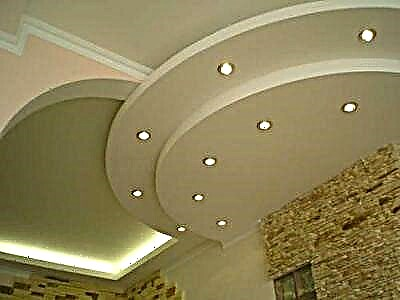
Complex types of plasterboard suspended ceilings
In general, they are similar in design to the previous types, only their structure is somewhat more complicated. In particular, any interesting patterns can be applied, as well as unusual shapes and elements. For similar designs created by the imagination of designers, it is difficult to strictly classify varieties.
However, let’s try to list some of the most popular types of complex drywall ceilings. And we will distinguish between those elements that are used to create them.
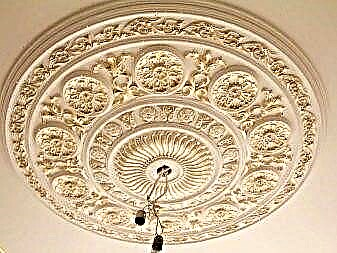
Figured ceiling - has a beautiful convex element
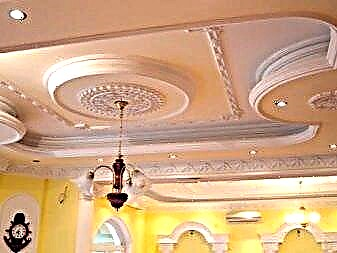
Here, against the background of an even base, a figured design stands out - for example, a flower or a complex geometric figure. As a rule, such an element is placed in the center of the ceiling, highlighting it along the edges (along vertical planes). The figure is usually made by the second or third level (and sometimes captures both of them).


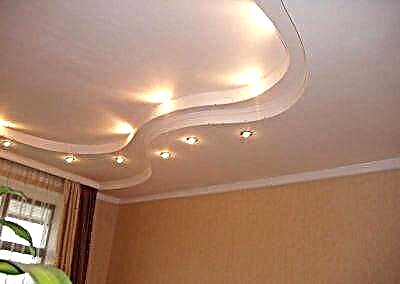
Abstract ceiling - for lovers of everything unusual
The most common variant of such a ceiling is an irregular spiral design. Other options are possible, as well as an intricate combination of several elements placed along the entire plane. The backlight gives the ceiling a mystery and charm. And if, when painting a surface, take paint of several tones, then you can get a completely unique ceiling. It will look simply stunning.


The soaring ceiling - for those who dream of flying
This type of ceiling is truly extraordinary. Drywall elements are attached to the concrete base in a tricky way. If in more detail, these are fitting sleeves and metal pins with locking studs. The result exceeds all expectations - these fixed figures look as if they are floating in the air. Periodically, you can rotate them on the axis, changing the composition. Naturally, this effect is enhanced by clever lighting.


Design Tips
- As a design, it is best to choose light colors. Such a ceiling will always visually add extra centimeters to the height of the room.
- A glossy and varnished surface will always look better than a matte finish. It perfectly reflects and scatters light. Stretch multilevel ceilings require sufficient wall heights.
- If you want to zone the room, it is recommended to choose multilevel ceilings with lamps.
Choosing a ceiling color scheme
This is one of the main issues in the design of the premises. Properly selected shades can significantly enhance the positive impression. Otherwise, the design will look ridiculous. It is not recommended to use more than three different shades of the palette. Also, do not use too colorful tones. This creates unnecessary tension, which will only aggravate the atmosphere.

The dark color of the ceiling is chosen when the style of the interior requires it, for example, as in this room a loft style
White ceiling contributes to a visual increase in room space
The universal option is white. You can also use pastel shades - they will fit into any interior. You should use tones that complement each other. Consider the different options. There are also options with various prints or patterns. Photo printing is possible.
Varieties
Any gypsum tile has a double base, usually a metal or wooden frame and a panel attached to it with a fiberglass mesh.


Plates are of several types: standard, design, tape and transitional.
The standard form of gypsum tile is a square of 0.24 square meters. m
Design models of plates can be of the most diverse form: cellular, coffered or domed. Such tiles always cost more.

Tape plates allow you to connect the surface into a single flat design. Also, using them you can create all kinds of ornaments. Adapter panels perform the same function. Due to the large number of mounts, they create the illusion of an absolutely complete surface.


Gypsum also makes surface types that mix well with other types. Plaster skirting boards can also be attached to another type of ceiling. Outlets under a chandelier or decorative stucco molding for any flat surface in the room will look good from it.


Manufacture
All plaster products that are mounted on walls or ceilings are created using silicone molds. To prevent these forms from deforming, they are usually placed in a casing or box during casting.
Pour the liquid into the mold first, then pour it into the gypsum container. So you determine the amount of material that is needed for one plate. Pour liquid into a container, then add gypsum and mix everything thoroughly. The solution should turn out to be quite liquid. Then wait a few minutes, mix again and place the gypsum material in the mold.


Gypsum should not be poured to the very top of the form; leave a little space. Align the material with your fingers, make sure that there are no air bubbles.
To avoid them, slightly raise the form, holding on to the edges, and then it will need to be sharply lowered: first one side, then the other. You will see how the bubbles appear on the surface.
If the gypsum material stains the mold around the edges, remove it using a spatula. Then you will need to start reinforcing. Use copper or aluminum wire, plumbing hemp, and hemp for this. On the flooded surface, it will be necessary to put reinforcement. Then smooth it with a spatula. After mixing the remaining material, fill it. After a while, the plaster begins to set.

Modern
Means the use of contrasting shades. The design is made in direct forms in compliance with the proportions. Systems with abrupt transitions are popular. Great for modern homes.

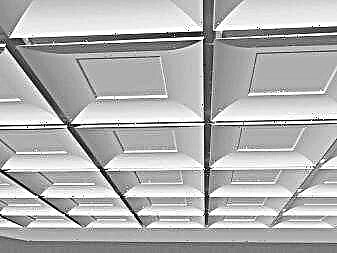
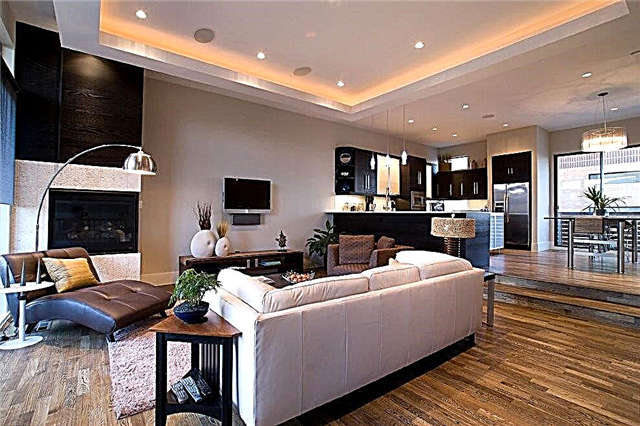
Spectacular recessed lighting on the ceiling of the hall in a modern style
High tech
The design of the premises is based on the use of glass and metal parts. It is advisable to make a massive ceiling with rough decorative elements. The glossy texture will fit beautifully, as it matches all the canons of style.
High-tech neon-lit living room with mirrored ceilings
And others
Plasterboard ceilings are popular for classics. Most often, you can find single-level simple designs. The design is selected depending on the design of the premises and the preferences of the owners. Use calm monochromatic colors.

Small classic-style room with a flat ceiling decorated with skirting boards and a plaster rosette
Minimalism is one of the main areas where modern solutions are applied. The simplicity of the design, straight lines, the absence of unnecessary decor are characteristic. Various combined variations of styles are possible.

The minimalist interior of the hall, in which a two-level drywall design is used to mask the ventilation system
How is everything going?
Grasping, the gypsum material becomes warmer, and when it is already quite hard, the plate begins to cool. This usually takes from ten to fifteen minutes - the time depends on the thickness of the plate. When it is time to remove the product, turn the box and mold upside down. The box will need to be removed. Starting from the center, gradually remove the silicone mold from the gypsum board.
Since the stove has not yet become completely dry, you will need to transfer it to a dry room and put it on a flat surface. So you will avoid deformation. However, in some cases, the plate is used immediately after removal from the mold. The gypsum product can dry from 3 to 5 days: it all depends on the microclimate in the room and on the size of the plate.

In the event that you waited too long, as a result of which the gypsum began to set in the container where it was made, it is better not to use the material obtained. Otherwise, it will take too long to wait for the product to freeze in shape, moreover, the plate will turn out friable, brittle.
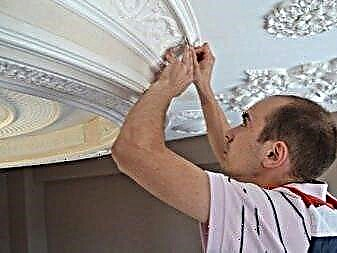
Stucco molding
There are various options for using gypsum materials, however, one of the most popular methods is the installation of stucco moldings. If you are going to mount stucco molding, you will need to prepare the ceiling surface. Make the ceiling as even as possible, apply putty on it. Then you will need to mark out the pattern with which you are going to decorate the surface.
It is necessary to carefully select the forms to create these or those gypsum plates: this will largely determine how successful the design of the ceiling will turn out.
A popular way to install stucco moldings on a ceiling surface is to install it immediately after removing it from the mold. The gypsum product does not yet have time to become completely dry. If it was necessary to create a lot of plates, and most of them had time to dry, soak dry products with water (in a bath or bowl) before carrying out installation work.
Stucco molding can be attached to the ceiling surface on putty or on glue, the base of which is water (suitable options are “Mounting”, PVA). Each specialist chooses the option that is most convenient for him personally. If the stucco molding is significant in weight, you can additionally play it safe and use self-tapping screws.
Fill the gaps between the tiles with filler material. Usually putty is squeezed into the joints using a syringe. Then the material will need to be smoothed with a finger. When the stucco molding on the ceiling dries, apply a water-based paint and varnish-and-paint material on it. It will be possible to paint a surface under bronze.

To the frame
In some cases, gypsum tile materials are installed on the frame. It is made from wooden boards. Tile materials should be screwed using self-tapping screws. When the installation work is completed, use a syringe to putty putty in place with screws and joints. For such a ceiling coating, a water-based paint can also be used.
In various rooms
If you are going to stop the choice on gypsum ceiling coverings, you should choose those varieties and forms of material that will be optimal in a particular situation. The ceiling should match the features of the room, fit well into the overall design.
Since perforated gypsum is able to provide sound insulation in rooms, this material is well suited for classrooms, bedrooms, and children's rooms. These products are very different, which allows you to easily select the best option for a specific design. In addition to standard square plates, design, classic options are available to consumers. In the living room you can use a variety of products.
Having painted the plaster decorative elements with gold paint, you can make the room look like a rich royal chamber.
You should not use reliefs and ornaments in the design of kitchen facilities. Surfaces in kitchens quickly become dirty: dust, soot and grease settle in stucco cracks in the shortest possible time.
It will not be easy to remove such impurities, and for this reason it is better to opt for ordinary smooth ceilings. The same can be said about the premises where people often gather. This also applies to the corridor.
Interesting options
Plaster ceilings are often chosen for cultural institutions. With the help of stucco molding you can highlight the place where the chandelier will be located.

Gypsum ceilings can be selected for the bedroom. A good option is simple geometric shapes. This design has a calming effect on a person.
Gypsum finish gives the room a luxury.

See how to make gypsum stucco moldings for ceilings in the next video.
The main advantages of gypsum structures
Gypsum ceilings - the reception of finishing almost any room. Ceiling structures of this type are characterized by an ideal surface, convenient and easy to use, and all thanks to the quality characteristics of the gypsum itself:
- the construction of ceilings and finishing work with the use of gypsum-containing materials is absolutely safe both during construction work and during the period of further residence in the room,
- gypsum is deservedly recognized as one of the most environmentally friendly and safe natural materials,
- gypsum materials are resistant to temperature extremes and are not subject to ignition,
- at any stage of the processing of the gypsum surface, the plaster rests smoothly, and the formation of bumps and “bubbles” is excluded,
- excellent ability of ceilings for any additional processing, including painting.
Making their choice in favor of gypsum ceiling surfaces, both the employee and the customer can be sure of the flawlessness of the final result. Finishing the ceiling using gypsum mixtures allows you to achieve perfect smoothness on the surface of the ceilings, and complement the idea of the created design with intricate shapes, shapes and compositions. Wherever a gypsum ceiling structure is being erected, it is always beautiful, comfortable, safe and easy to maintain throughout its entire life. The additional use of layers of noise and heat insulation gaskets will provide reliable protection against extraneous external noise, as well as maintain heat and comfort inside the house.
Subtleties in the construction of gypsum structures
One of the reasons for the popularity of gypsum ceiling structures is their ability to hide even significant defects from view. For example, gypsum suspended ceilings allow quickly and without a trace to hide joints in floor slabs, cracks, damaged areas on surfaces, as well as get rid of overhanging wires, pipes and other communications. Decorative gypsum ceilings are suitable for rooms of most categories. Their installation will not take much time, regardless of the type of room being repaired.
For the implementation of the installation of single-level gypsum ceilings, deep knowledge in the construction is simply not needed. Repair can be done with your own hands. It is enough to have the skills to use the building level, as well as have experience using a punch and a chopping thread.


Why is this ceiling decoration technique preferred even more often than standard plastering? Everything is simple. When installing gypsum structures, dirt from ongoing work, their complexity and duration are minimized.
The initial stage of installation work will be metering and, accordingly, marking. Depending on the general design project of the room, it is worth considering in advance all possible difficulties in the form of transitions, levels and joints of the structure. Having asked how to make a ceiling without resorting to the help of professional decorators, it is worthwhile to prepare a standard set of working tools in advance:
- screwdriver
- hammer drill
- water level
- roulette,
- a small hammer.
Often, masters advise using a grinder, but when installing a gypsum ceiling at one level, you can completely do without it. When marking up, taking into account the new height of the ceiling surface, you can tentatively evaluate the new height at which the new ceiling will be lowered and mounted. In most cases, the selected room design is also taken into account. So, for example, the classical style does not require multi-level structures, and modern trends, on the contrary, allow the use of two or more levels of the ceiling.

Plaster ceilings: two levels
If during the repair it was decided to do it exclusively on our own, then for the installation of a two-level ceiling with your own hands, it is better to make all the necessary preparations in advance:
- Correct (verified) marking of fastenings and profile location.
- Selection of the type of fixture depending on the complexity, levels and number of light sources.
- To speed up and simplify the installation of the structure, plasterboard sheets should be cut in advance.
- All profiles provided for fastening bends and joints must be bent first.
It is not difficult to erect ceilings and sheets of drywall. It is enough to follow the recommendations of specialists, which are quite accessible on most specialized resources. Most often, preference is given to drywall for the improvement of bedrooms and kitchens. Whatever the design in the bedroom, any idea is quite affordable to implement with your own hands.


The bedroom is one of the rooms where two-level gypsum ceilings make it possible to achieve the effect of soft illumination due to the use of spot ceiling lamps of various capacities or a recessed LED strip between the ceiling levels. The last trick allows you to provide soft lighting in the room, effectively emphasizing decorative techniques, lighting solutions, as well as expand the space.
A backlit ceiling is an excellent solution for those who are not fans of familiar chandeliers and bulky lamps in the center of the ceiling. As lighting sources, the most modern lighting solutions can be used. The power and type of lighting devices provide excellent results. Unexpectedly, but competently located light sources can completely change the room or hide existing deficiencies. Among the structures of drywall sheets can be identified:
- impressive weight
- the inability to maintain the integrity of the sheets in the event of dismantling,
- gypsum sheets are not the most suitable material for decorating rooms with high humidity (with the exception of moisture-resistant types of drywall).
Recently, techniques for lighting rooms using LED strips have been most in demand. Such tapes allow you to achieve a soft backlight, and in several colors. The tapes are flexible, durable and safe to use. However, their only significant drawback may be a fairly high cost.
How to build a ceiling in the kitchen yourself?
The kitchen has long become a room not only for cooking and eating, but also a kind of lounge area. Modern kitchen projects are effectively complemented by bar counters, hanging cabinets and glass display cabinets. Kitchen sets with a backlight built into cabinets or the upper bar of the headset faded into the background.


It completely replaces the usual lighting, including the central chandelier, lamps placed on the entire surface of the kitchen ceiling. If you have patience and become familiar with the basic information materials, you can get a quality and beautiful ceiling in your own kitchen with your own hands. Here are some things to take care of in advance:
- Measure the area of the ceiling being repaired.
- Choose the optimal type of drywall sheets.
- Cut the workpiece in advance, depending on the idea of the final design.
- Prepare the cable, connection and cuts in the sheets for the location of the light sources.
- Correctly select and fix the profile guides, taking into account the number of levels, the type of sheets and the location of furniture in space.
Why is drywall so attractive even for beginners in repair work? The fact is that sheets of impressive size are easily sawn into the necessary elements, and in addition they are able to bend into the necessary shapes and at the required angle. It is enough to moisten the cut elements evenly with a moderate amount of water. The ceiling in two levels is also suitable for small rooms. The main thing is to pre-plan all the additional elements in the ceiling and the location of the lamps.


The second level of sheets, as a rule, is attached above the working surface, that is, above the stove, sink or countertop. If the area of the kitchen allows, then the protrusions can be equipped above the dining area or above the recreation area. A simplified option is the construction of classical rectangular ceilings: with right angles and clear lines. If the idea involves the introduction of rounded shapes into the interior, then the gypsum workpieces should be moistened in advance and given the desired shape. If the repair is done with your own hands, then you should not neglect the elementary help in supplying elements, cutting or fixing the profile.

Wherever finishing and repair work is carried out, drywall will achieve the desired result in the shortest possible time. Of course, like any other building and finishing material, gypsum sheet has a number of advantages and disadvantages. However, given its safety, many options for performance and a variety of brands and manufacturers, gypsum material for many years holds a leading position as a finishing material for all categories of premises.
How to choose?
The most common type of coating is single-level. It is usually used in rooms with a low ceiling. Recessed LED spotlights will help in this case to zone the lighting and save electricity.
For a children's room, panels with color stencils are suitable. Panels with a bright color composition in the middle are also suitable for a living room.


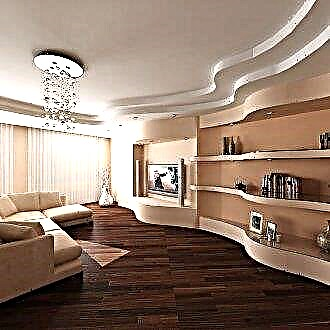
The multi-level option is suitable for spacious high rooms. In addition, this surface allows you to give free rein to design ideas. Unlike single-level coatings, in this case, you can play not only with color, but also with design. Curvilinear structures are easily combined with mirror surfaces, which creates an interesting visual effect. Glass, gypsum stucco, wood, plastic also go well with the gypsum surface.

Properly selected stucco molding can give the room a classic and even antique style. Also from the drywall you can create a ceiling with an imitation of wooden beams. If the room is small and requires light, then it is better to pick up white drywall.


Lighting coverage can also be different, it all depends on design goals. There are classic fixtures, multi-domed and even hidden, which are installed between tiers.

Options for lighting plasterboard ceilings
It is important to choose the right light sources. Comfort and coziness, as well as the overall effect, directly depend on this. It is possible to use several lamps at once. It looks modern and attractive.
Drywall is a fragile material, so chandeliers that are too heavy should not be used.
Using the illumination of different colors, you can achieve quite interesting results. Combine different options and combinations to divide the space into separate zones. In one part of the room, you can use more powerful lamps, and in others - muffled, creating an atmosphere of comfort and home warmth.
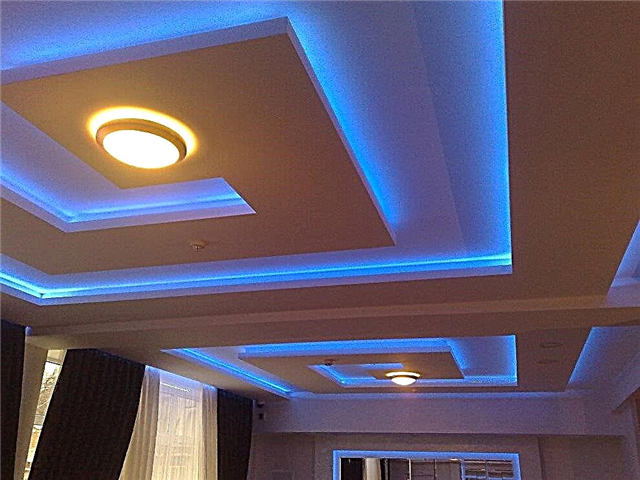
An example of zoning a hall using LED illumination of a two-level ceiling
Popular solutions are:
- small spotlights,
- beautiful chandeliers made of light materials,
- neon tubes for highlighting individual elements of multi-level structures,
- LED or fluorescent bulbs.
Each of the light sources is used to create a specific effect. Spot lighting allows you to create soft diffused lighting. The lamp will allow you to focus on a specific area, and light tapes make it possible to give the room an unusual charm.

White plasterboard ceiling in two levels with spotlights
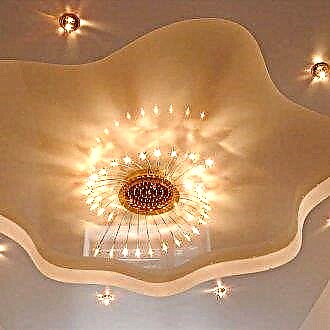
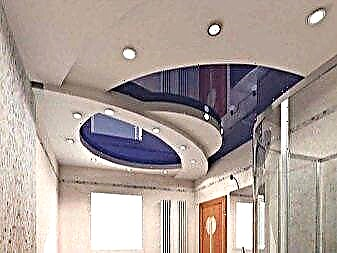
The ceiling of the original design in the form of intricate figures resembling a maze and illuminated by blue light
Advantages and disadvantages of plasterboard ceilings
The material is used as a casing, cladding surfaces of dry rooms. It consists of two layers of cardboard, between which there is hardened gypsum. It is environmentally friendly, not subject to burning, decay. Gypsum plasterboard, like any building material, has positive qualities, and is also not without drawbacks. Consider the advantages inherent in the design:
- Allows you to align uneven surfaces without much effort,
- Differs in moderate weight of sheets,
- It’s easy to complete the installation, a person with minimal construction work skills can handle it,
- Inside the frame used for fastening plasterboard sheets, communications (wires, pipes, ducts) are imperceptibly laid down,
- Allows you to play with forms, create complex, multi-level ceiling structures,
- In the frame, you can install an additional thermal insulation layer, sound insulation,
- It serves as a good base for lighting elements,
- Gypsum plasterboard surface can be painted, papered, lined with ceramic tiles.
Unfortunately, the material is not without certain drawbacks:
- When using it, the height of the room is significantly reduced, which makes its use in a room with a low ceiling unacceptable,
- So that the sheet does not lose its original appearance, it is forbidden to store it, install it in unheated rooms with high humidity,
- If the installation technology is violated, cracks may appear.
Types of drywall sheets
Products representing a mineral composition held on both sides by paper layers differ in certain parameters and structure. Characteristics define and divide products into several types, each of which has its own abbreviation:
- GCR - a standard sheet of drywall. It is used in heated rooms with minimal humidity (up to 60%). The coating color is gray-brown. The inner layer consists of gypsum containing few additional additives.
- GKLO (fireproof) - designed for rooms with increased fire hazard (kitchen, attic, boiler room). Marking red, pink. The core consists of gypsum with inclusions of fire-resistant mineral fibers (fiberglass, clay). Able to withstand open fire for up to one hour.
- GKLV (moisture resistant) - designed for rooms with high humidity (more than 60%). Installed in kitchens, bathrooms, pools. It has a green color. It is processed by antiseptics, antifungal impregnations. Silicone granules are added to the core.
- GKLVO (water-, fire-resistant) - used in places with high humidity, where there is a danger of fire. Includes the characteristics of both previous species.
- GVL - an improved version of the GCR. Gypsum board is a homogeneous material without a cardboard coating. Made of gypsum, which is reinforced with cellulose waste paper and special additives. Differs in big weight and cost.
- Arched - characterized by a small thickness, bends well, is used in the construction of arches, wave-like structures, domes. Work on the bending of the product is carried out in two ways: wet, dry.
- Facade - has a yellow color, is resistant to weathering, is used to decorate facades.
- With insulation - it is a standard sheet, a panel with a layer of insulation glued to the back side. During installation, it requires calculations of the humidity of the room, a natural ventilation device between the base and the building material.
- Vinyl Coated - Laminated panels have a thin film coating. Resistant to fading, retain their original appearance for a long time. Thanks to the coating of the front surface, they do not require additional decoration.
Variety of ceilings in shape and level
The building material used for leveling and finishing the ceiling is in demand by the masses. Various designs are created from the standard sheet. There are also many forms that can be given to the ceiling surface, consider them:
- Rectangular The standard option. It hides all the bumps, visually expands the space of the room.
- Square. It is identical to a rectangular shape. It is found in rooms with equal length walls. May have a multi-level design.
- Round. It is used to highlight the center of the room, goes well with the objects installed there (sofa, table).
- Oval or curved. Gives the room an original look, allows you to make it unobtrusive zoning.
- Abstract or geometric. May have a patterned or curly shape. Allows you to decorate the living space.
Plasterboard ceilings differ not only in the type of sheets used, shapes, but also in design. Three main types can be distinguished:
- Sibling. They are a ready-made element of the interior. They can serve as the basis for multi-level structures. Installation work is within the power of a person with little construction experience. They consist of a frame set according to the level, with plasterboard sheets fixed to it.
- Two-, three-level. The main rule is that each subsequent level is smaller in area of the previous one. Subsequent rows are mounted on the parent frame. Multilevel ceilings, in turn, are divided into:
- frame - the design has one or a pair of steps located along all walls,
- diagonal - subsequent to the first level are located in one half of the room, and the dividing line (straight, curved) connects the two corners of the room diagonally,
- zonal - the second, third levels are used as the border of the zone of a certain purpose (dining, working, resting place). - Complicated. The design is identical to the previous ones. The difference lies in the presence of non-standard forms, elements, patterns.
The number of plasterboard ceiling levels directly depends on its height. For example, frame structures can go down half a meter.
Design features for GKL ceilings
There are only two ways to fix the drywall structure to the ceiling - hemming, hanging. There are slight differences between them. The first is used on flat surfaces. If the difference between the highest and lowest places is more than 2 cm, then the design cannot be installed, in which case the second option is used. Let's consider in more detail each type of installation:
Methods for joining a drywall profile
Bindery. The frame is assembled from a ceiling metal profile, very rarely use wooden battens. The lathing is mounted directly to the ceiling surface, and the distance to the drywall is minimal, equal to the width of the material used for the frame.
Suspension. The profile is not directly connected to the upper partition. The frame is attached to the surface of the walls, and fixing to the ceiling occurs using vertical suspensions. The crate thus fixed hangs on the ceiling. From here it got its name. In this design, you can change the inter-ceiling space.
Ceiling Design & Style
Design options, ceiling decoration unlimited. At the same time, drywall allows you to build multi-level ceilings, which, when properly selected, combined with lighting fixtures, will help create a unique interior of the room. The use of building materials is permissible in almost any room, whether it is a living room, bedroom or hall.
The design of the ceiling is very important, it must be magnificent, while combining with the general style of the interior. A huge selection of building materials allows you to combine the look with any direction. Let's consider some styles:
- Minimalism. Single-tier ceilings are suitable, having a fairly simple appearance, without unnecessary decor elements. As lighting, preference should be given to LED strips, spotlights.
- High tech. A small number of decorative elements are welcome here. The color scheme can be performed in both white and dark colors. Glossy finishes are well suited for decoration.
- Classic. You can use multi-level designs, complex arched, curly ceilings. A chandelier fits well in the center of the room.
- Modern. Most often, light shades are used. Direct fixtures can be used. There are no strict rules for interior design.
- Loft. The joints between the drywall sheets are intentionally not covered with putty. Do not withstand a perfectly flat surface. When painting stains, roughness. Communications are left open.
We make a project for the future ceiling
Simple decoration of the ceiling (painting, wallpapering) does not require drawings. Using drywall create complex design elements, so in this case, you can’t do without a project. It includes a graphic image, calculation and cost of the required building materials, stages of work. When compiling it, such moments are taken into account: the style of the room, the design and parameters of the furniture set, the height of the ceiling, its area, wall decoration and flooring.
What should include a ceiling project
- Sketch (preliminary sketch). A good drawing can be done by a person with drawing skills. It allows you to visually see what the constructed ceiling will look like, to make an assessment of its compatibility with the general interior of the room.
- Drawing. It defines the design of the future product. May consist of several sheets. Includes all components, types, sections, section of elements, their interaction, explaining the principle of operation. It takes into account the method of combining the product with the elements on the ceiling (electrical wiring, pipes).
- Calculation of materials. The developed project will allow calculating their number, thereby saving the budget. When buying, you should take more consumable building materials by 10% -15%, this is due to the fact that part of the products will have to be cut, respectively, their size and quantity will decrease.
We calculate the necessary material
After compiling the design documentation, they proceed to the calculations. All elements and consumables are taken into account here. For clarity, we calculate the necessary materials on the example of a rectangular room 6 x 3 meters:
- Work begins with determining the perimeter of the room. To do this, we use the standard formula P = (a + b) * 2, where P is the perimeter, a, b is the length of the walls. In our case (6 + 3) * 2 = 18. This figure is equal to the number of meters of the guide profile UD, which is mounted on all walls under the ceiling.
- The next step is to calculate the length of the bearing profiles. Standard placement requires a fastening step of 40 - 50 cm. For the first case, 600: 40 = 15 pieces of 3 meters (45 meters), for the second 600: 50 = 12 strips (36 meters).
- We count the number of necessary suspensions. The distance between them is 60 cm. Based on previous calculations, we get that for a fastening step of 40 cm, this figure will be 45: 0.6 = 75 pieces, in turn, for a step of 50 cm - 36: 0.6 = 60 pieces .
- The number of cross-shaped elements used to fix the structure (crabs) is calculated by multiplying the bearing profiles by two. That is, for the calculations performed in the second paragraph, 30 and 24 pieces, respectively, will be required.
- At the final stage, it remains to calculate the number of sheets of drywall. As a sample, take a standard sheet measuring 1.2 x 2.5 meters. First, determine the area of the room and the coating used. S room = a * b = 3 * 6 = 18 m², it coincides with the perimeter. S gypsum = 1.2 * 2.5 = 3 m². Having made a simple calculation 18: 3 = 6 sheets.
Step-by-step installation of GKL ceiling
Building materials are economical and reliable, with its help you can create single-level, two-level, complex ceiling structures. It allows you to implement any design decisions. Many people choose a drywall ceiling for their monastery. At the same time, some of them use the services of specialists, others build the structure with their own hands. But it will be useful for all of them to familiarize themselves with step-by-step instructions that reflect all the moments and subtleties of the finish.
How to prepare the ceiling
Before starting the installation, preparatory work is carried out in the room, which includes the following steps:
- Room cleaning. From it it is necessary to take out all the furniture, remove the curtain rod for curtains, household items that interfere with events.
- If available, the old finish is removed from the ceiling, the surface is cleaned of stains.
- Joints of plates, cracks are smeared with a layer of putty, after which the entire plane is covered with a primer, which includes antiseptics.
- After the primer dries, the room is de-energized, and work begins on installing the frame.
Equipment and materials
Any work begins with the preparation of the tools used to carry it out, counting and acquiring the necessary materials. Indeed, in the absence, lack of consumables, pencil, level at hand, the work will have to be interrupted in search of the missing component. So, for the implementation of activities you will need:
- hammer drill, screwdriver, jigsaw,
- measuring instruments (tape measure, level), pencil, marker,
- hammer, metal scissors, construction knife,
- consumables, screws, dowels, anchors,
- basic, directing ceiling profiles,
- suspensions, connectors,
- heat-insulating, waterproofing, noise-insulating building materials,
- sealing tapes
- GKL sheets,
- Decoration Materials.
Ceiling marking and frame assembly
Work begins with determining the lowest angle in the room. For this, the laser level is ideal, if there is none, an ordinary tape measure is used. At this point the first mark is put. Depending on the presence of built-in lighting elements, the distance from the ceiling will be 5 mm if they are absent, 9 mm when placed.
The level marks the points in the remaining corners located at the same height. After that, a level is drawn between the marks in the form of twine, or a line connecting all marked points is drawn. Further on the marking, the guide profile UD is set. To do this, with a drill, holes are drilled into which dowels are clogged. Docking seams are further strengthened, between the two profiles on both sides of the joint a piece of tin, plywood is started.
After installing and securing the guide profile, proceed with the installation of the main one. Given the dimensions of the standard GKL sheet 1.2 x 2.5 m, the marking on the ceiling should be done in parallel lines with a pitch of 40 cm, perpendicular - 250 mm. That will fix each edge of the sheet. At the intersection, the joints of the main profiles are interconnected by crabs.
The next step will be to fix the suspensions. They are connected to the ceiling using anchors. The distance between the hanging fasteners is made within 50-60 cm. The first is installed, retreating 25 cm from the wall. After connecting the suspensions to the profile, a finished frame is obtained.
Isolation - what to choose and why is it needed
The construction market offers a huge assortment of drywall sheets. They have an additional layer of insulation, for example, a standard sheet with foam. Products are protected from moisture, fire. Multilayer partitions themselves become a soundproofing layer.
Depending on the material of the floor, the insulation suitable for the particular structure is selected. If you take a wooden ceiling, then you can not do without a layer of steam, waterproofing. Moisture penetrating through the gaps can lead to rotting of the wooden, profile frame, swelling of drywall.
For concrete slabs, monolithic floors, additional thermal insulation is required. Most often, mineral wool, polystyrene, is selected. Insulation fills the empty sections of the frame. In this case, the presence of built-in lighting lamps is taken into account. Overheating of the wiring may cause a fire.
If necessary, you can install additional sound insulation. As such protection, mineral wool, slabs, polyurethane foam, cork, coconut fiber, and others are used.
Electrical wiring
Installation of electrical wiring begins with the development of a circuit where all the key elements are indicated, from the distribution box, to each switch, light bulb. Work is carried out before installing drywall sheets.
After laying the cable from the distribution box to the electric points, the wires are connected to the final element, if not already installed, the contacts are isolated. Connection of veins is carried out only through terminal blocks. It is forbidden to lay wires in bundles near metal pipes.
Gypsum plasterboard paneling
The building material is sensitive to changes in humidity, temperature fluctuations. Therefore, it must be brought into the room where it will be installed, and given a couple of days to adapt. After you can proceed to the casing. Installation begins with the installation of a sheet in one of the corners. Having departed 10 cm from the beginning of the profile, the first screw is screwed in, the distance between them is 20 cm.
The screw head is recessed into the sheet. On panels running parallel to each other, the screws should not be on the same vertical line.
Next sheets are attached, with each edge being bolted to the frame. For places where the whole panel does not fit, the sheets are cut off.
Ceiling decoration
After completing the main work, proceed to finishing. The first thing to do is align the resulting plane. For this, joints and gaps are putty, the surface is primed. For decorative finishes, the following materials are chosen:
- Water based paint. It is resistant to moisture, does not wipe, there is no smell. For small surface defects remaining after puttying, use a matte base to mask them. Glossy paint, on the contrary, will highlight all the roughness.
- Wallpaper. The classic version. The choice is unlimited, depending on the preferences of the owner. Their shade should be taken into account. Light colors will visually increase the height, dark - reduce.
- Plaster. Acrylic based raw materials should be selected. You can choose any type of plaster (thin, low, medium, large). In doing so, take into account the fact that thin fillers are not able to mask an uneven surface.
- Tile. Mainly used material such as polystyrene, polyurethane. Ceramic products are rarely used, require additional surface treatment, reinforced frame.
Combined ceilings look very interesting. For example, a combination of a tensile structure with a drywall mounted.
Lighting and ceiling lighting
Lighting occupies an important place in the entire structure. It performs, in addition to the main, also a decorative function. Depends on the correct choice of each lamp, LED. It can emphasize the ceiling, or make it unsightly, tasteless. Lighting plasterboard ceiling coating can be: open, closed, combined.
As the main lighting, the following types of lamps are selected:
- pendant chandeliers
- overhead lights,
- fluorescent lamps, as well as daylight,
- LED strip
- built-in spotlights,
- combined lighting.
For additional decoration of the room, backlighting is used, which is not independent lighting. You can perform it using different sources. The most popular of them are diode (ribbons, duralight) backlighting, neon tubes, fluorescent lamps.
Drywall Tips
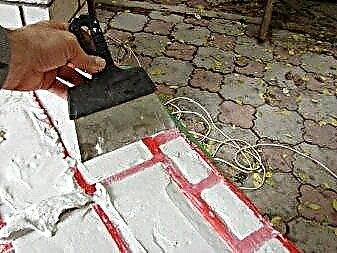
When working with material, the sheet must be cut to a specific size. To do this, markup is done on the panel with a pencil, after which a cardboard coating is cut using a construction knife. Then the sheet is placed on a table or a flat surface, breaks according to the markup.
To make the surface smooth, it is necessary to mask the joints and seams between the plates. To do this, chamfers are removed at the ends of the sheet. Their angle of inclination directly depends on the putty method. This requires a special planer.
In addition to cutting and sealing joints, plasterboard sheets can be bent, giving them wavy, curved shapes, for example, an arch, an oval, a circle, a curving diagonal line. Dry or wet method is used to bend sheets. Together with the sheet, the guide profile is bent, on which cuts are made on the sides with the help of scissors for metal.
Conclusion
Drywall ceiling is popular with many private owners. The material is inexpensive, it can be used both for office premises and in the house, apartment, equipping the ceiling from the entrance to the hall. It is easy to work with plasterboard sheets, while using them you can create complex designs that emphasize the individual interior of the room.